Custom Order
We make it easy to create a custom order.
Knowing Each custom order is unique it is treated as such with no one approach fits all. Using one of the 3 steps, complete the order form and leave it ti us.
- Method 1: Fill in the online form and we will take it from there.
- Method 2: Download and Complete the PDF order form
- Method 3: Create your own template and send that along with the order form
How to Order
In order to place your order follow these steps.
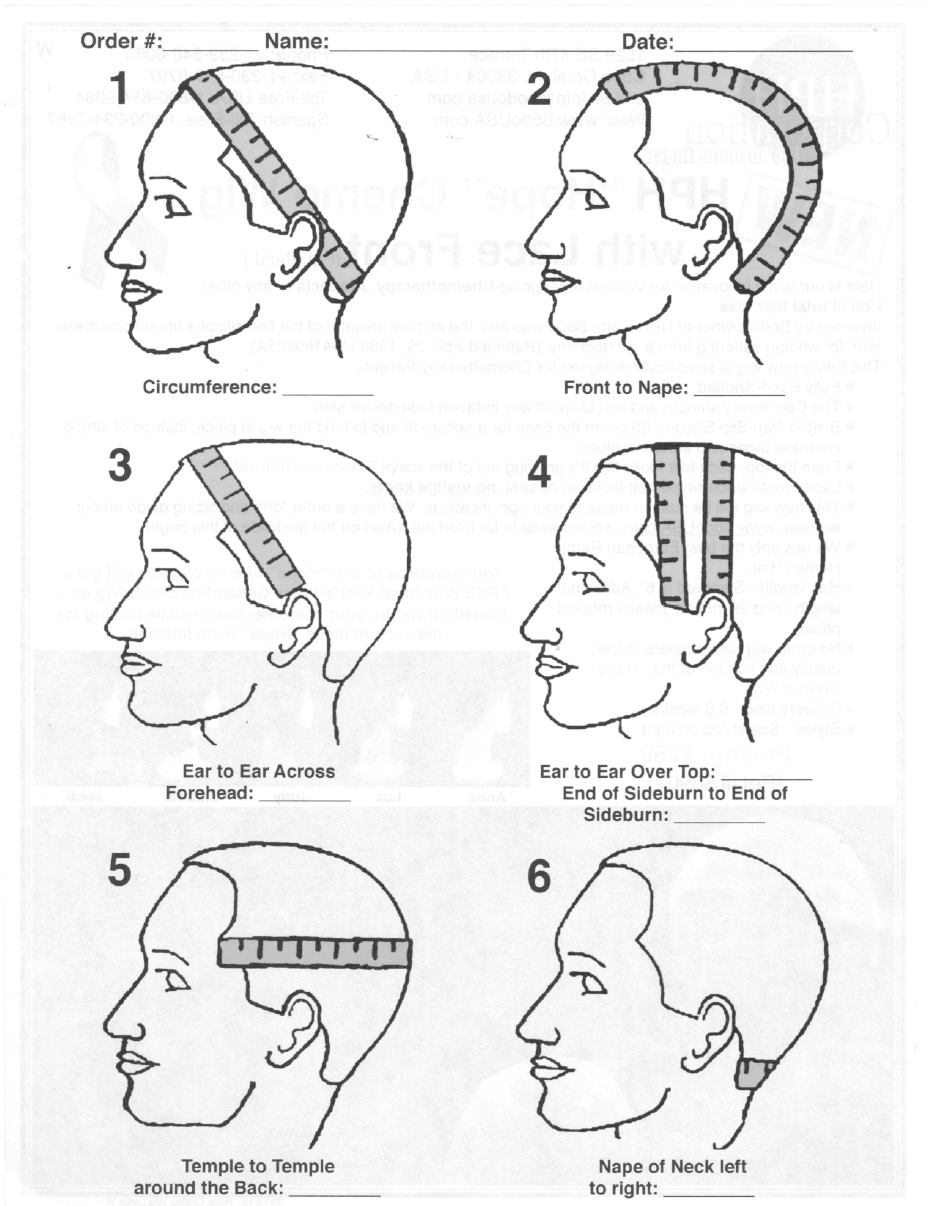
- Complete the form below (use the images for guidance)
- Submit your order form
- We will review and contact you.
Note: You will be contacted for applicable taxes and shipping costs.
mail us the Order Form
Click on the image below to download the Measurement Sheet and mail it to us with a hair sample for colour.
Make your own template
|
Items you will need
Once you have made your template, complete the order form and mail them to us along with a hair sample for colour. View other video tutorials on our YouTube gallery. |
 |
Step 1.
One of the things we’ll need you to do is provide an accurate template of your head so that we can custom create your wig for you. Since the key to the success of a wig is its fit, the base must correspond to your head shape and original hairline recession. Making a tape template of the head which can be seen through and drawn upon is an ideal way to show us the exact contours of your head. The clearer the plastic and tape, the clearer the template will bePlace an 18 inch square of clear plastic wrap so that it covers the top portion of the head. After pressing the wrap close to the head, use clear tape to contour the head shape. |
 |
Step 2.
Beginning at the forehead, place transparent tape on the wrap over what will become the outer perimeters of the pattern. These outer perimeters are determined by the areas of baldness. After you have taped the boundaries, cover the inner portion of the plastic wrap with overlapping pieces of tape. Apply 3 layers of tape. The tape will lock the plastic wrap into a permanent transparent tape template. |
 |
Step 3.
Hairpiece Pattern Using a Sharpie permanent marker, draw pattern lines on the tape template while it is still on your head. Though requirements vary from person to person, some rules of thumb apply to most. Front hairline should usually be established by placing 3 or 4 of your fingers above the brow line. Lines are drawn from that point to form a pattern which covers the bald area. Deeper recessions look most natural. After the entire outer perimeter of the pattern is drawn, the desired style should be indicated. |
 |
Step 4.
Indicate the date the tape template was made, as well as your name. After you have finished marking the tape template, add one more layer of tape (now 4) to cover and seal in the markings. Remove the tape template from your head and trim the excess plastic wrap off the edges. Send it along to us and you’ll have your wig in about six weeks! |
|
|
Mail Your Template & FormNew Roots Studio |

